API Flow Trigger Documentation

Shopware 6 App

Installation via ZIP file

  1. Download the app ZIP file from the Shopware Store.
  2. Navigate to „Extensions“ > „My extensions“ in the Shopware admin interface.
  3. Download the app ZIP file by clicking on the „Upload extension“ button in the top right corner.
  4. Now a new app will appear in the list called „API Flow Trigger – Execute Flows via API easily“. Please click on „Install app“ here.
  5. Once the installation is complete, enable the app by activating the switch on the left side. 
Installation via ZIP File

Installation via Composer

In the command line, navigate to the Shopware 6 root directory and run the following command:

composer require store.shopware.com/AppliApiFlowTrigger

Install and activate the app by running the following commands:

bin/console plugin:install AppliApiFlowTrigger --activate
bin/console cache:clear

Setup API Trigger in Flow Builder

Navigate to the Flow Builder. 

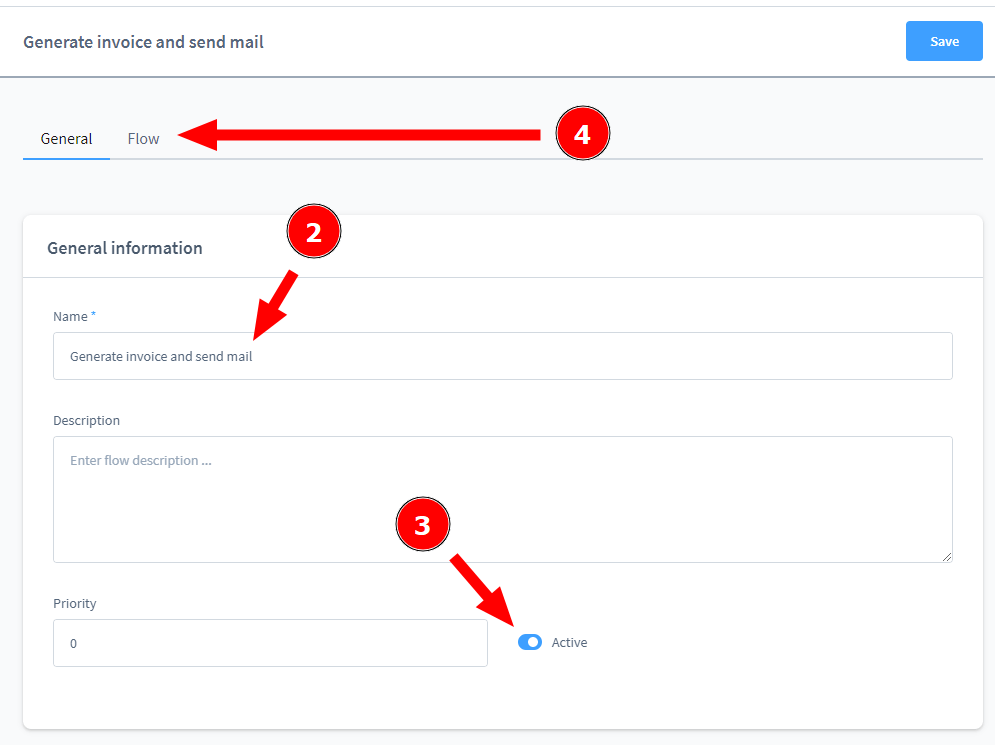
Add a new flow by clicking on the „Add flow“ button, insert a name, activate the flow and and switch to the „Flow“ tab.

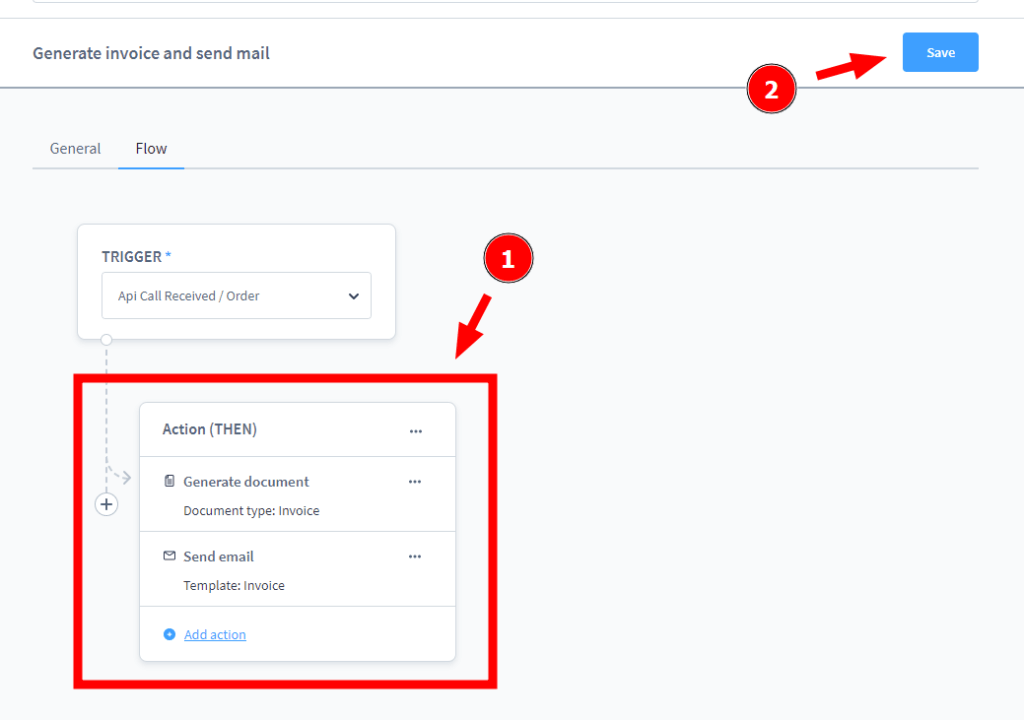
Now it’s time to choose the API Trigger, which dispatches the flow. Here you can decide between
„Customer“ and „Order“. In our example we choose „Order“, because we want to generate an invoice for a specific order and sent it to the customer via email. 

Here is a explanation of both triggers: 

  • Order Trigger
    Choose this trigger, if you want to do stuff, which is related to a specific order. This trigger enables you later to choose a specific order by providing a Order Number or Order ID when you send the API Request to your Shopware 6 instance.
  • Customer Trigger
    Choose this trigger, if you want to do stuff, which is related to a specific customer. This trigger enables you later to choose a specific customer by providing a Customer NumberCustomer E-Mail or Customer ID when you send the API request to your Shopware 6 instance.

Just add some actions and save the flow.

Authorize in Swagger UI

To trigger a flow for the first time, we use Shopwares inbuild Swagger UI. Swagger UI provides the technical API documentation and enables us to build and test our API request, which we can later use in production. 

Navigate to your Swagger UI in a Shopware 6 Instance, should be in „dev“ mode. If you have no Dev-Environment by hand, you can test out the app’s functionality by using our Demo Shop. You can find the credentials here

You can reach your own Swagger UI by navigating to: „http://insert-your-domain-here/api/_info/swagger.html

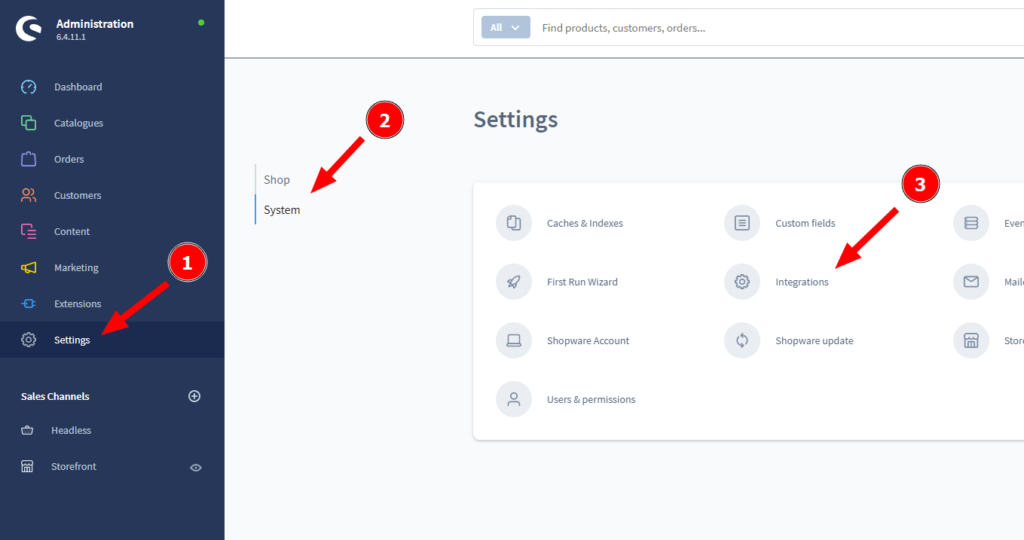
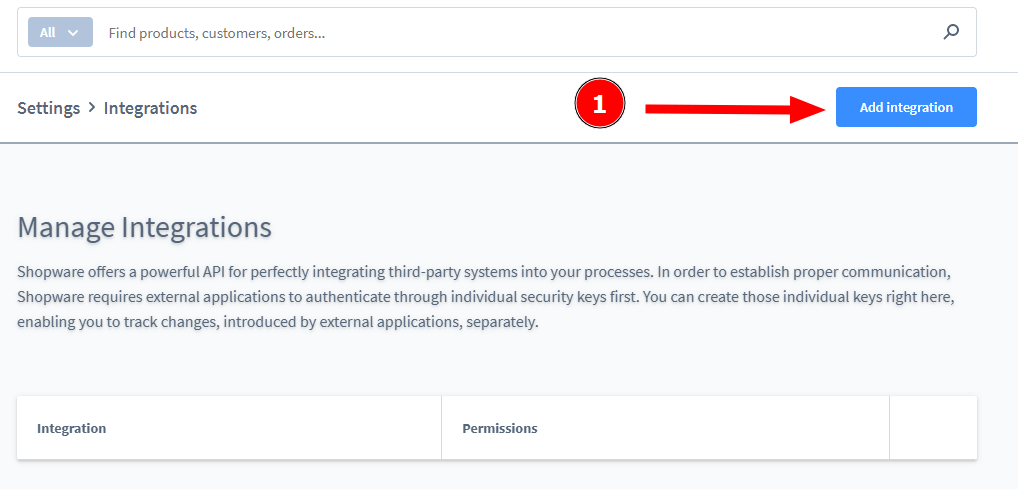
At first we have to Authorize. Therefore we have to create a Integration first.

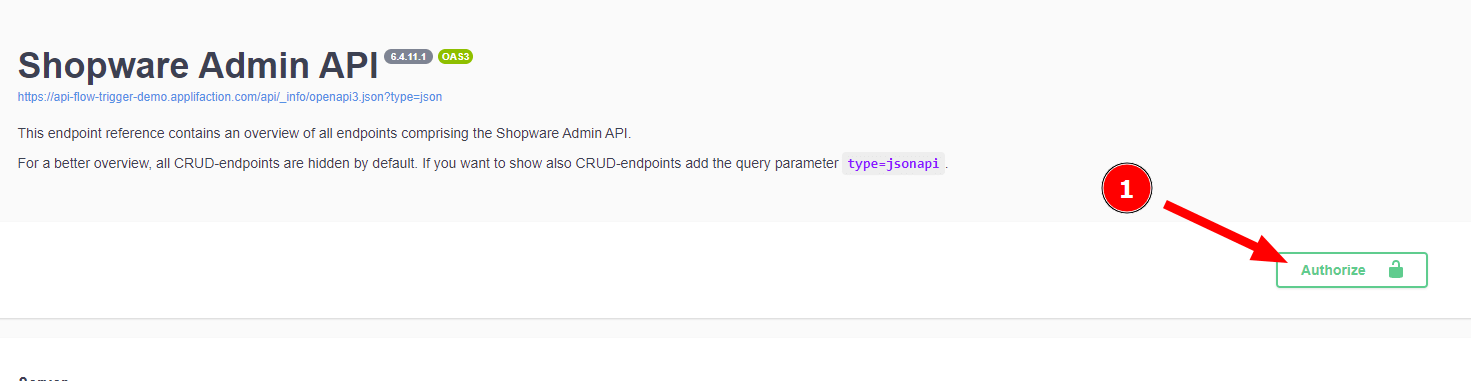
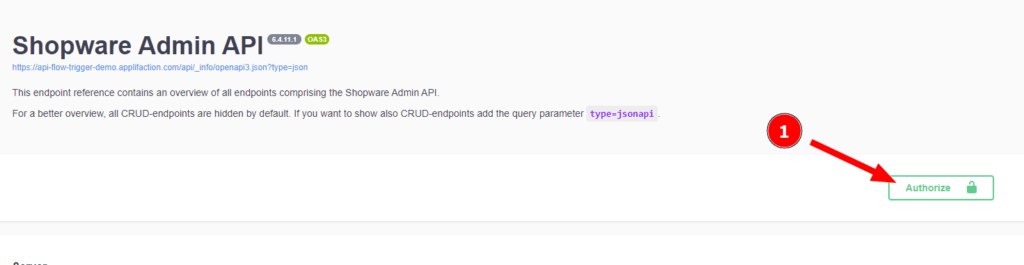
Back in our Swagger UI click on the „Authorize“ button on the right top corner. 

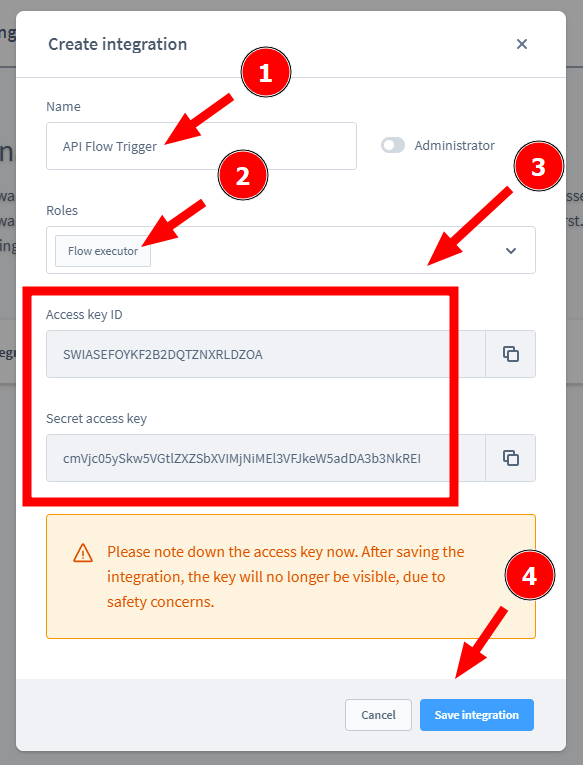
Choose a proper name like „API Flow Trigger“ and choose the Role „Flow executor“. 

Note down the Access Key ID and the Secret access key. We need it later and you won’t be able to see them again. 

Now navigate to your Swagger UI (http://insert-your-domain-here/api/_info/swagger.html) or use the Demo Shop

Click on the „Authorize“ Button in the top right corner. 

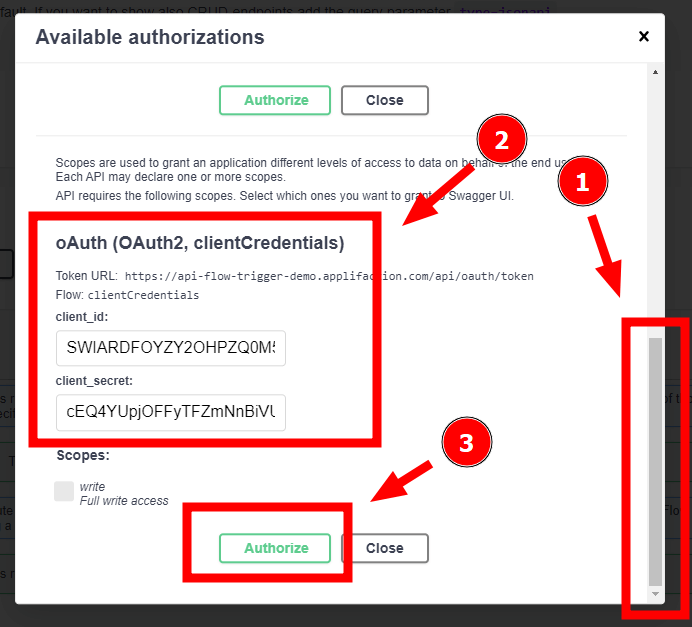
When the dialog appears, scroll down and enter your Access Key ID in the field client_id. Enter your Secret access key in the client_secret field. 

Excursion: Generate Bearer with CURL

When you want to authorize yourself later in production, you have to generate your Bearer Token programically

Example CURL Command:

curl -X POST -H "Content-Type: application/json" \
-d "grant_type=client_credentials&client_id=<YOUR CLIENT ID>&client_secret=<YOUR CLIENT SECRET>" \
https://<YOUR SHOPWARE DOMAIN>/api/oauth/token

You will receive a Bearer Token in a response, which looks like this:

Example Response:

{"token_type":"Bearer","expires_in":600,"access_token":"eyJ0eXAiOiJKV1QiLCJhbGciOiJSUzI1NiJ9.eyJhdWQiOiJTV0lBUkRGT1laWTJPSFBaUTBNNUMwWExBRyIsImp0aSI6IjIxMDYwMjY2MDcyNmMzYmVlOGNhYzgzNmJkYjg1MTllODE4ZDY3NjdjYmU3Y2UzYzUzNDk3Yzg3ZWMzZjk1MTljODk3Y2ZhZjVlODVhZDgzIiwiaWF0IjoxNjU1MzA2Njk2LjkxODcyNywibmJmIjoxNjU1MzA2Njk2LjkxODcyOCwiZXhwIjoxNjU1MzA3Mjk2LjkxODQ0Nywic3ViIjoiIiwic2NvcGVzIjpbIndyaXRlIl19.g_kvJnwwfEvFg0SIqNcOkDxvdSHfojQT2NZ2gvXDx_xrAMwSyldt9Xbhi5JVIn5nRDu5Y1URoB77-Am0dn2RgqOpO3FUEiZF6E6HCnxueyQcIb-zc-iHFMIB63Ub16PL0ewwjFfk-Lfn2lXtUi4zdwgKKRPM-x_SAWcgeFzfFU3CN3VQWQrDZfNXrkic2BNjtIswprpPN812iv_J96EH3SrR83M3IdnDqSvrXRtZP7Uw1_ZdfcCtWHMcOIS7MQWaaHN4u2z-LqD981-EhOT6DZImz1oAJeISbdGmb1yi3ivAxwMCP4nQqpOBJLUDcQPHCE2zkhxgp1qMpfEhmt_piQ"}

When you make your API requests, you have to add an „Authorization“ header with the value „Bearer (YOUR BEARER TOKEN)

Example Request:

curl -X GET -H "Authorization: Bearer eyJ0eXAiOiJKV1QiLCJhbGciOiJSUzI1NiJ9.eyJhdWQiOiJTV0lBUkRGT1laWTJPSFBaUTBNNUMwWExBRyIsImp0aSI6IjViYzlmMWM5N2E1Y2FhOTkxNzdjNmQwMTcxNWMxNGIwMjA4ZjY4Mjg0ZTBkZjA0YjI4ZDE5YzEzZWFjYzRlZDdkNWUwOGM5MTQyNDU0YjllIiwiaWF0IjoxNjU1MzA2Nzk1LjQ2NTE2NCwibmJmIjoxNjU1MzA2Nzk1LjQ2NTE2NiwiZXhwIjoxNjU1MzA3Mzk1LjQ2NDY4Mywic3ViIjoiIiwic2NvcGVzIjpbIndyaXRlIl19.ksmUcBx_ExthlapTVTuHj6kAddNi8wfipVRPvey5e5w4OjW6SIwN8ynXObyvqqJZ4TIPKUFLGrc_47n5rWm-sRrBpBJvIt_mq6ICde0IGdctF3M2B8UAMsG4zDvhgdiudZ6BihxDmRoO1xjOwnMxTsj8NPiMSstzTRVY7EnsHOAo6oagBpi_LQaoKJ5o3mFY_asbu05potq_ng0ZO1gzBLXh3NE2RD5b9onGdOX6v_zrYZg_6zGDAmKZFS288oM13-5gs6am_-5RU5jqx_OtsNxxOyUYN_fEWCaNScmtEX5XpujSnDX3IpuJ8HkX9UKgCjeMvB3Ui7zAM7MGXLHC_g" \
https://<YOUR SHOPWARE DOMAIN>/api/flow-trigger/customer/flows

Excursion: Demo Shop

Swagger UI

Click on the „Authorize“ Button on the top right corner and enter following credentials in the oAuth (OAuth2, clientCredentials) section. 

client_id:
 

SWIAZU5HEGJ3MVPJEEXYEUHEYW

client_secret: 

MFlmbllGQWlKVVd4cmd5NGxpbWZsVFRhRzA5bVJ4MllqbzE3TWU

Admin

Login Credentials:

Username: admin
Password: shopware

List executable Flows via Admin API

At first we have to find out the Flow ID, of the flow we created earlier

Because we used the „Order“ Trigger, we use the API route „/api/flow-trigger/order/flows“ to get a list of all triggerable flows. 

After you click on the „Execute“ button, you receive the ID and the Name of your previous created Flow. Please copy the ID in your clipboard.

Excursion: List Flows with Customer API Triggers

If you used a „Customer“ Trigger in your Flow, you can use the „/api/flow-trigger/customer/flows“ API route to list executable Customer Flows. 

Trigger Flows via Admin API

Click on the „Try it out“ button of the „/api/flow-trigger/order/dispatch“ API route.

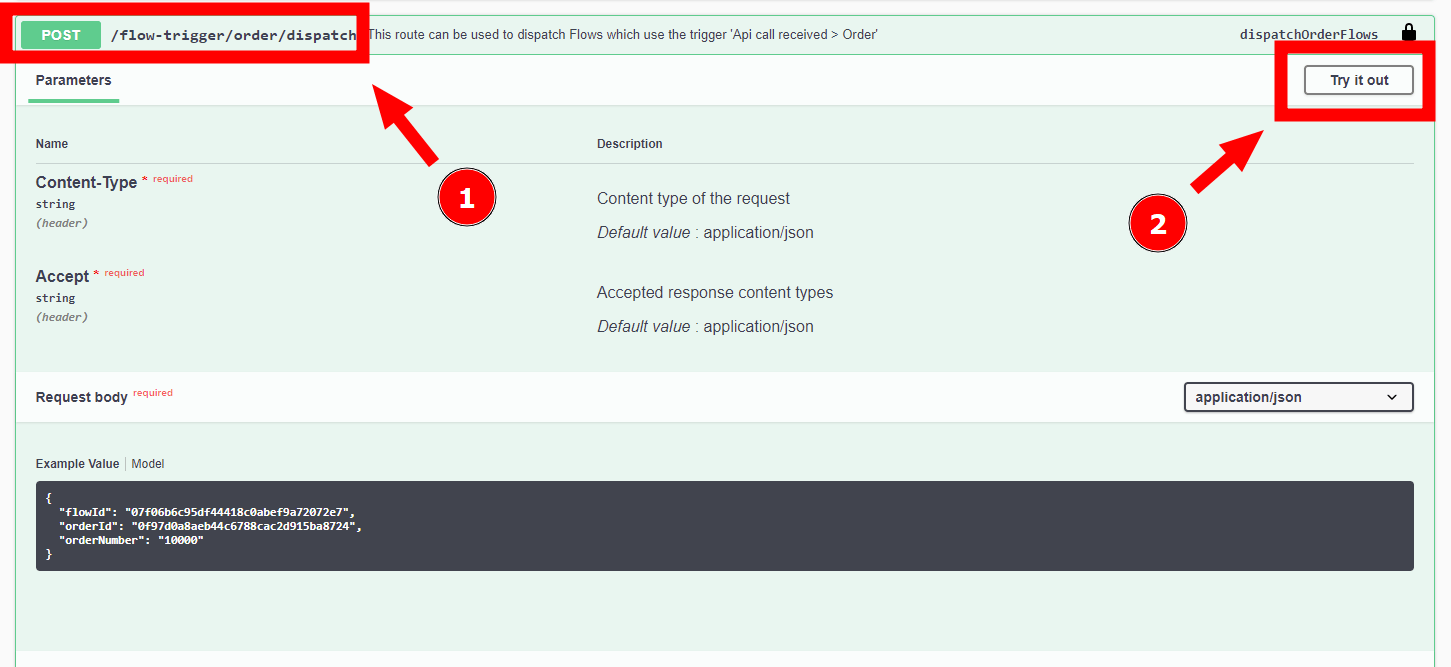
Paste the Flow ID you copied earlier to the request body, remove the orderId parameter and enter a valid Order Number

You can choose either to use the orderNumber or orderId parameter, when you create your own API requests later. But in this example, we use orderNumber

After you entered your parameters, click on the „Execute“ Button

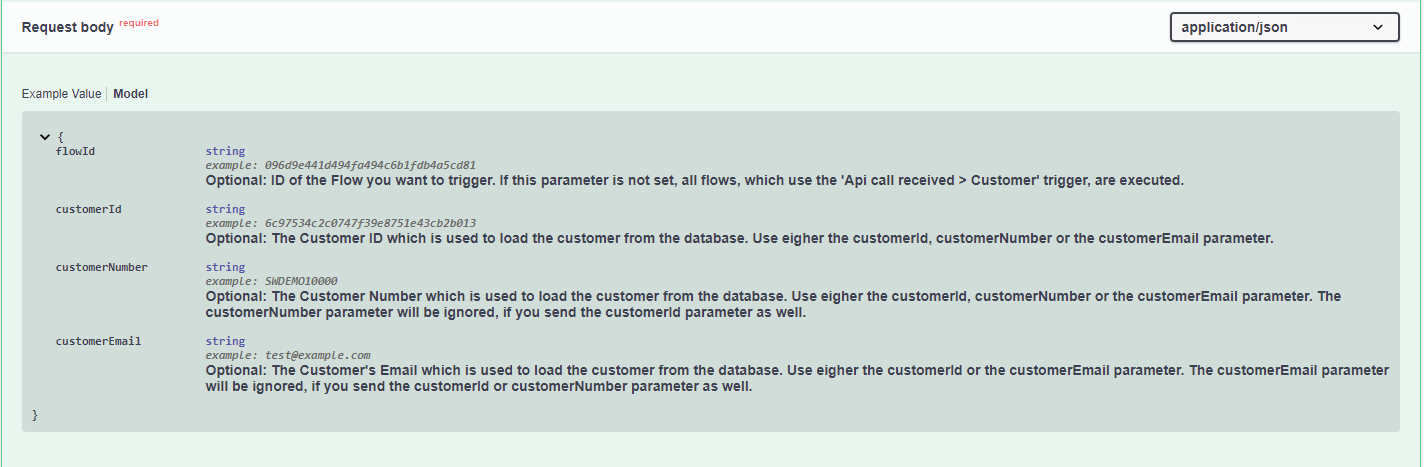
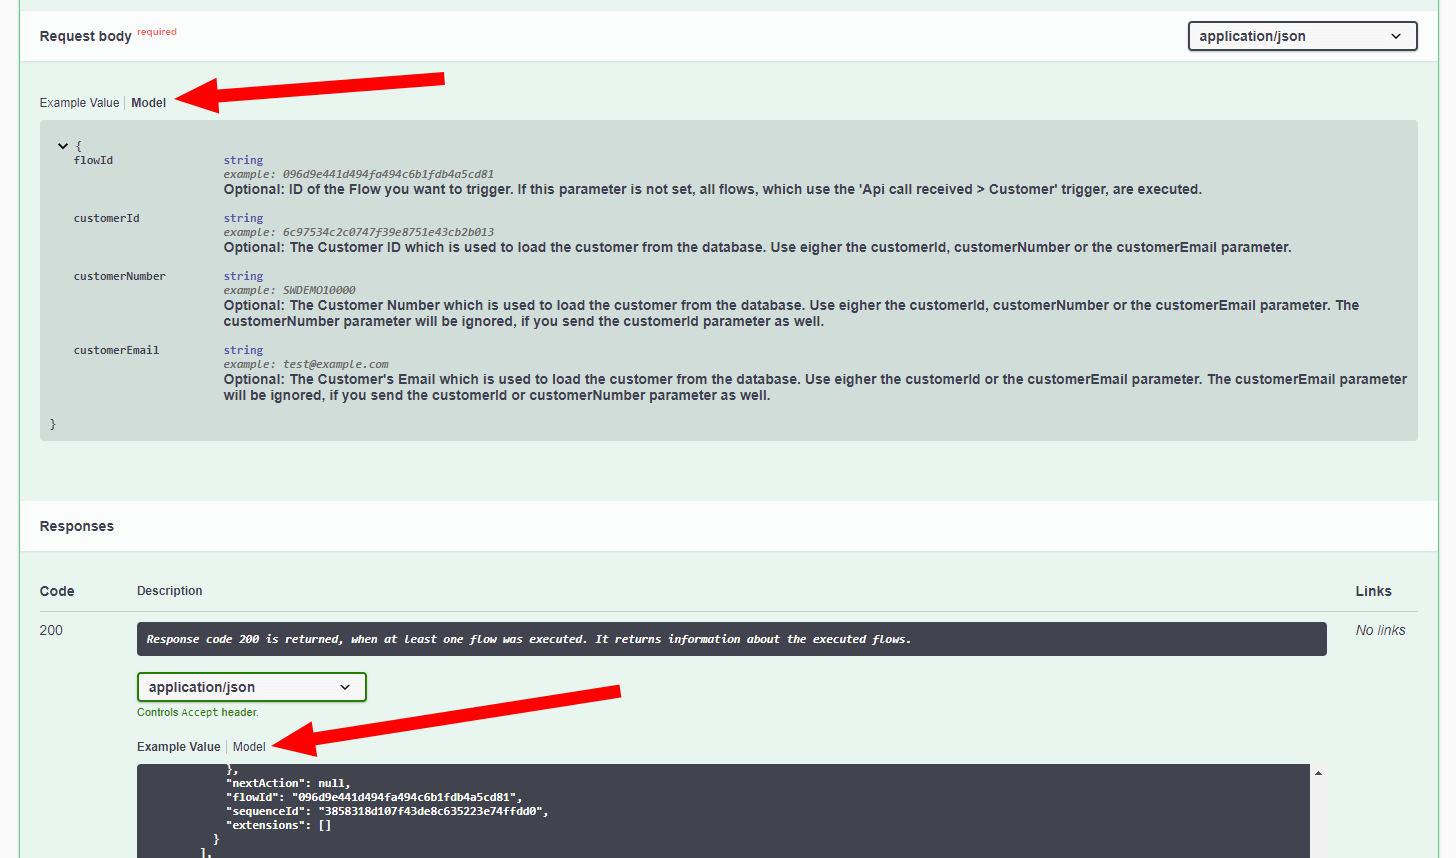
In depth explanation of request body parameters:
Click on „Model“ to get more information about the accepted parameters of the API route.

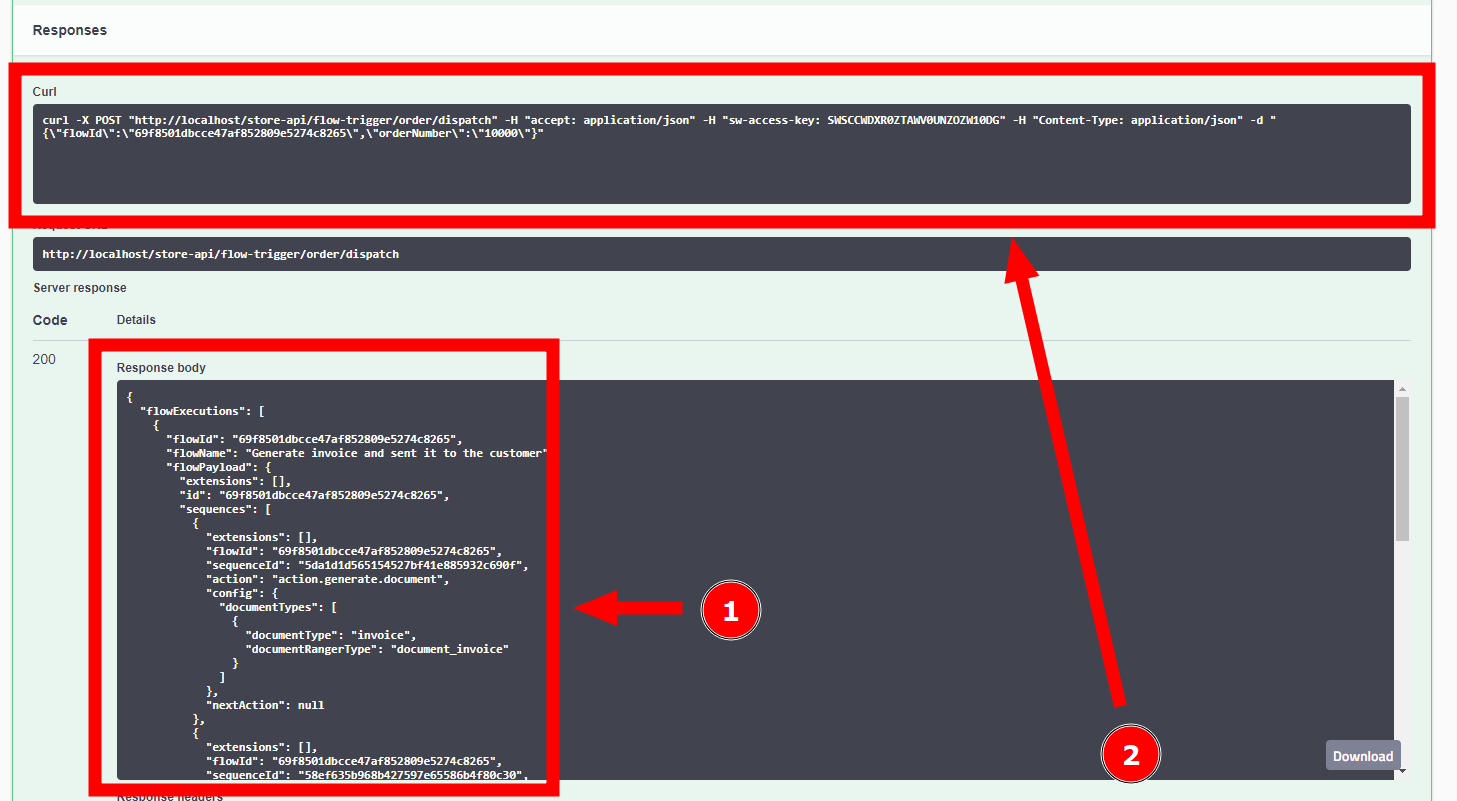
You can see the response body when you scroll down. 

You can also see a Curl request, which you can use to send your own API request. 

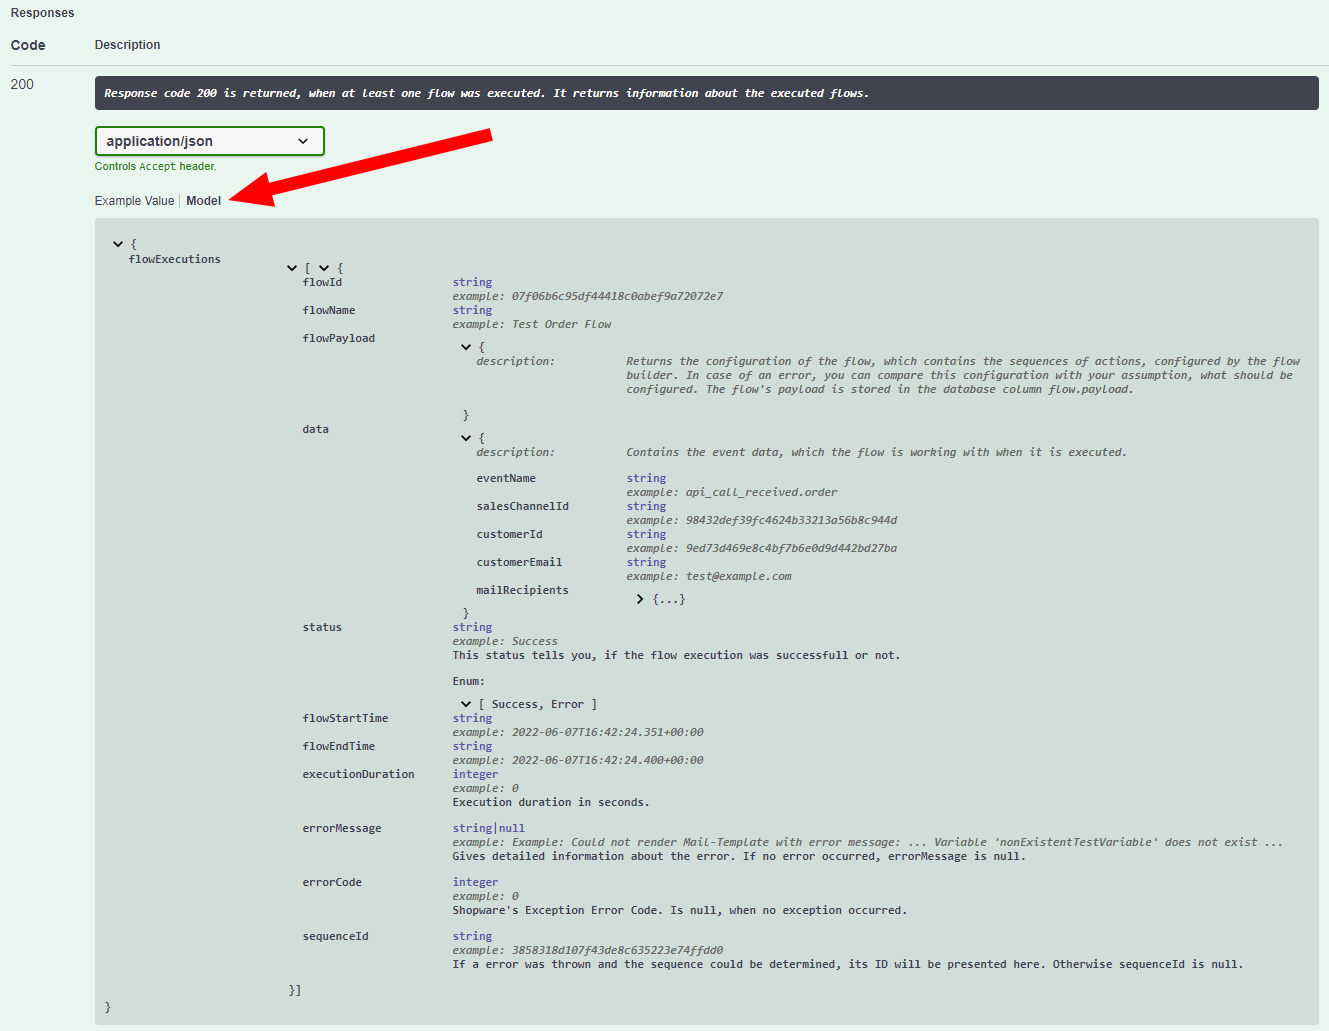
A in depth explanation of the response can be found, when you scroll down to the documentation of the responses and click on „Model„.

Excursion: Dispatch Customer Flows

Flows with the „Customer“ trigger are dispatched similarly.
The difference is, that you use the API route „/api/flow-trigger/customer/dispatch“

Instead of the orderNumber or orderId request parameter, you have to use one of the parameters:

  • customerId
  • customerNumber
  • customerEmail

Flow execution Log

In the Admin interface, you can find a detailed log, which shows all information about flow executions that are dispatched by the Admin API.

API Documentation

You can find the technical API documentation in the Swagger UI of the Demo Shop. 

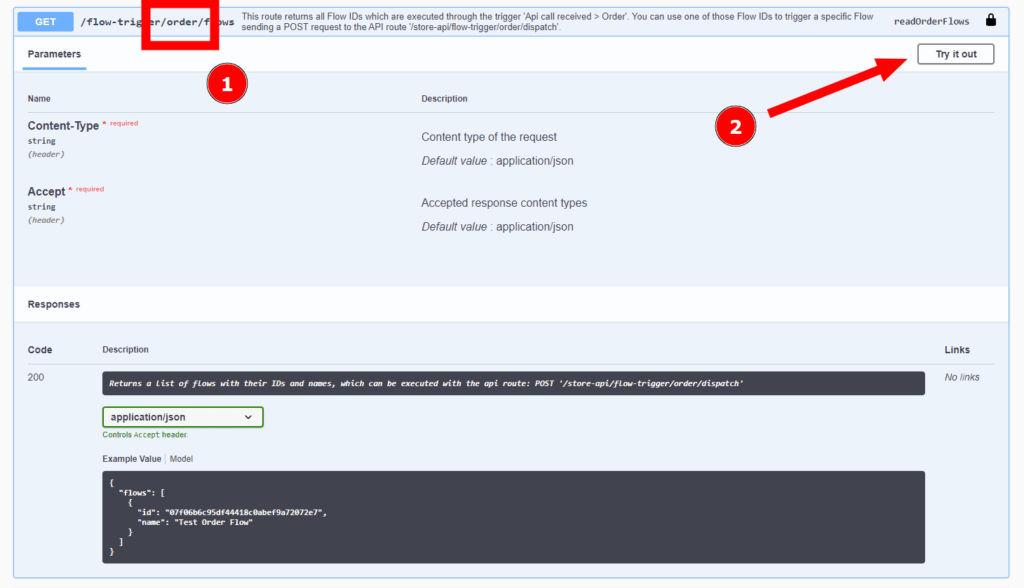
Click on on one of the following routes to get more infomration about it. 

Click on the „Model“ link next to the Examples Values of Request bodies and Responses to get a detailed description about it.

You can test the API in our demo shop. Just follow the instructions provided by this documentation. You should start by authorizing yourself in our Swagger UI.